Thursday, June 10, 2010

I'm sorry I have been gone so long...

Wow. It's been almost three weeks since I have made an entry here and I feel really bad about it. I would love to tell you it's for some exciting reason, but the fact is that I have had to do work type stuff. Eww! I know, huh? Sadly, I wasn't able to work on my dollhouse for all this time..... well, maybe a few minutes here and there, but no REAL work.
*sigh*
Hopefully, I'll be able to get a bit more time to work on it in the weeks to come, and I'll post every time I do.

So, all that being said, I do have a couple of pictures to put up for today, of the things I was working on when I could.

We'll start with the main bathroom.

I have made a wooden bathtub for this room. I used "seashells" for the feet to give it a "claw tub" feel, and I kind of like the way it turned out.

In the master bath I put in the big mirror, cabinet and sink.

I haven't added the fixtures for the sink yet because I don't know that I am thrilled with the way the sink turned out. I'm thinking about pulling it out and maybe doing a faux marble or something on it. It was supposed to look like stone, but I think it just kinda looks like a lumpy mess. I am not pleased. I need to do something with it and make a couple of toilets!


I also wanted to show you something I am making that has nothing to do with the dollhouse except that it's a miniature....

I am loving these!! It's a set of bookends I made and have listed on Etsy. Of course none of the stuff in them or the books is included in the sale, but as I was making them, I decided I need to make another set for myself. I have a PILE of cookbooks and am picturing these bookends holding them and one end done as a modern kitchen, and the other in maybe a 50's style, but still using a coordinating color scheme.... kind of to represent the ages of my cookbooks. Wouldn't that be cool? And it would show off some of my craftsmanship and my love of miniatures and cooking all at the same time! Then maybe I could do a couple more for all my "art" books with a mini workshop in one (doing miniatures) and a computer studio in the other to represent my work in graphic design. All in time.........

Anyway, got lots to do today, so until next time.........

Sunday, May 23, 2010

Meet Sigourney....

We are still getting rain almost every day... now mixed with sunshine....

Can you say "HUMIDITY" and MOSQUITOES" every one??

Actually, I have declared war on the mosquitoes (a bag full of mosquito coils and bug spray for those stupid enough to ignore the coils), and have them beaten into a bit of submission, which allows me to go out and work on my dollhouse in little bursts without becoming eaten too badly. Right now I have cabinets and moldings clamped and drying.... not much to see and because of the humidity, they are taking forever to dry.

HOWEVER, as I have said in my last post, I have been taking advantage of my inside time, and have been working on area rugs and mats, and learning some new techniques for other stuff. I always loved to figure out how to do something new. It keeps my miniature making always something new and fun.

Okay, all that being said, meet Sigourney:

She is named that because of her red feathers. I have been missing my pet parrot, who is still in the States for a little while longer, and decided my dollhouse was going to need a pet bird. I always wanted a Macaw, so now I have one. (My real parrot is a blue fronted amazon and I didn't have the right colored feathers to do him.)

Sigourney is made with a styrofoam core, then painted, feathered and flocked. Her eyes are glass beads and reflected funny in this picture, and her feet are made of wire.

Here is a close up of her:

So, I had to build her a stand, and as I am always saying, the difference between a good dollhouse and a GREAT dollhouse is all in the details. Sigourney not only has a stand with a toy, food and water and a ladder, but she also has newspaper in the bottom with a couple of feathers and a few "droppings" as you can see in this picture:


*giggles*
Yeah..... it's all about details.

As I have been saying all along, everything in the dollhouse will be for sale. Sigourney is no exception. You can find her listed on my Etsy shop. If she doesn't sell, she will go in my dollhouse. If she does..... well..... I'm working on a pair of parakeets right now!

Until next time!

Wednesday, May 19, 2010

More progress in spite of flood and pestilance...

It has been raining pretty good for the last three days here. Now for those of you following, or that know me, there are a some facts you know:
1) I live in the tropics.
2) The weather stays warm enough year round that it's okay to be outside.
3) My "workshop" is outside on a covered patio.

Here are some facts that I have just learned, and you need to:
1) My roof covering my patio leaks in several spots.
2) The tile that was used on my patio is as slippery as ice when it's wet.
3) The mosquitoes in the tropics are VICIOUS BAST@#&%*, VERY aggressive, and come out by the millions when it rains here.

Okay, now that you have that knowledge, you will understand that most everything I have done for the last couple of days, I have done INSIDE my house, and I have only been out at the dollhouse to do things that absolutely HAD to be done there, or to take pictures.... and even then, I was getting bitten so badly that I ran back inside and forgot to get one of the pictures I was going to take. Y'all will just have to live without the picture of the little round entry rug I made. I'll show it to you next time. The sun is setting right now and the mosquitoes are getting worse, and I am a coward!

Okay, all that being said, I do have some stuff to show you. These are all things I have been doing inside, but then ran out to put it all in place and take pictures.

We'll start with the main bathroom:

As you can see, I got the sea horse painted, hook put on, and door installed. I also got a medicine cabinet put up, the counter put in with sink, and just for fun, I have added a seashell "soap dish" and a nice fuzzy rug. It's not a finished bathroom, but it's an awesome start!

I also made a rug for the third bedroom...

We have kind of decided that this room will become a "teen" room, thus a great shag rug.

In the second bedroom, I painted the upper portion of the door, and although it's a lot better, I still think It needs mirror doors on the closet.

Don't y'all agree?

Well, I'm going to keep on hiding inside until the sun comes out.... maybe tomorrow? We'll see.
Until then...

Sunday, May 16, 2010

Slow as the tortoise...

Yup, I'm feeling like the tortoise in "The tortoise and the hare" story. I spend the whole day working my butt off, yet when it comes time for pictures for this blog, there is little to show. It's not that I'm working slow really, it's just that I have gotten to a part that has lots of detail to work properly, and it is REALLY time consuming!! Between drying times and little things that really don't show, it doesn't make for fun and exciting pictures.
*sigh*

Still, I move steadily forward.

Todays offerings are the doors in room two.


Well, I got the closet doors finished and installed. They slide well now, and look pretty good, I think. I also finished the door to the bedroom, but have not installed it yet. It's just propped in place for the picture and so I could get a good look at it. I look at the room, and am not really pleased. I can't quite put my finger on it, but it doesn't have that clean modern feel I am going for. I'm thinking that I WILL replace the closet doors with mirror, and I may paint the top panel of the door (where the wallpaper is) with the color that is on the adjoining painted wall. I think that may help.

Here's another view..

See, that doesn't look as bad. I think there is just way too much wallpaper in that first picture. That'll teach me to try and cut costs. I guess I'll just have to buy the pieces as I can afford them, and if it takes longer, well then, it just takes longer.

As I said, there really isn't as much to show you as I'd like, but I did get the main bathroom door designed the way I want. I have decided to go with a "ocean" theme in there, and I added this awesome sea-horse to the back (inside) of the door. I will add a hook in his eye to provide my tiny dollhouse with a place to hang a towel or robe. That should look cool.

I am planning on coming back in with some paint and adding some detail to this little guy so that he really pops. It should look cool when done, then I can get it installed.

Well, I know it doesn't look like much, but I am pleased with where it's headed. We'll see what I can get done today.
Until next time...

Saturday, May 15, 2010

I'm back and at it again...

Wow. Hard to believe it's been a week! Sorry to be away so long! It's been a rough week.

Last Saturday night I started not feeling great, then woke up on Mother's Day with the worst tummy cramps I've ever had. I can't remember anything like that since I had my daughter, but they were in my tummy.. not lower. Anyway, stayed icky through Monday. Tuesday I felt a whole lot better, but was weak as a kitten for a few days and just couldn't deal with the heat of working outside. As most of you who have read my whole blog or know me personally, already know, I live in the tropics, and we are in the middle of our summer. It gets hot and humid. I actually don't mind it, and my studio is outside, but when you aren't 100%, it can be a little oppressive.

In the mean time I have been working on stuff to go inside the dollhouse... plants, kitchenware and other such things. I've listed a couple on Etsy, but sales have really taken a dump. I have no clue what is going on, and it is extremely depressing. Without the sales, it won't be long before I can't go any further on this dollhouse. That breaks my heart. Most of the stuff I have been using is recycled, but things like the glass and mirror have to be cut special for me, and while the guy gives me a huge break, it still isn't free.

Well, yesterday I decided it was time to get back to it. I spent the early part of the day just cleaning dust and junk out of it. We've had a couple of storms this last week, and even though it is safely under a roof, the wind still blows stuff everywhere.

When I last worked on this house, I was working on making doors, so that's where I picked it up. I cut and glued up some frames for the doors that hadn't yet been made, and started installing the ones that had.


As seen in the above two pictures, The doors to the third bedroom and the master bedroom have been put in. I need to add more wall above them today. They still have no handles, but I'll sit down and make some in the next day or so.

I also started putting in the track for the by-pass doors for the second bedroom.

Originally I was thinking I'd like to have mirror doors, but when sales dropped off, I have decided that in the interest of money, I'd just match the wallpaper over plywood. Maybe if I start making some sales again soon, I can mirror the master bath and third bedrooms closet, or if it's soon enough, I can replace these doors. We'll see. I hate cutting corners, but we have to do what we have to do, even if it isn't what we wanted.
*sighs*

Anyway, I'm off to hit it hard today. I'll see how far I can get. Until next time....

Saturday, May 8, 2010

Starting on doors....

Yesterday morning was a busy morning, so I only got to work on the dollhouse yesterday afternoon and evening. Since I am trying to get the last of the details for this second floor done, I decided I probably should start getting the interior doors in. I can't do the wall above them until they are in place. So, I started looking at the different rooms and realized that if I just used plain old doors, it sure wouldn't be in keeping with the design and detail I am trying to put into this house. That being said, I decided that each room needed a door that was in keeping with the style and theme of the room. So far I only have done two doors and they are not yet installed (only propped in place so y'all can see them), and they don't have door handles yet, but I thought you might like to see where I am going with them.

The first is the door to the master bedroom.
This is the view of it from the hall way.
and this is what it looks like from inside the room.
and here is a view of the room with the door so you can see what I was going for. I thought that the basket weave design would be in keeping with the wallpaper I chose for the room. I used a green wash to stain the woven part on the inside, then varnished the entire door. I will do something very similar for the door leading into the bathroom.

Now, for the second room. I was inspired by the wallpaper in the 3rd bedroom first, so that one got the next door.
I took the idea from the large leaf in the wallpaper design, and hand painted it on to the inset panel of the door. Then I did a paint wash over the trim and put varnish over the entire door.
I left the outside (facing the hall way) plain.

Now I am hoping that while I make the door for the master bathroom, I will be inspired with a great idea for the main bathroom and the 2nd bedroom. Well, see how today goes.

Until next time....

Friday, May 7, 2010

The wall...


I'm starting today's entry with the wall. Of course it will look better once it's finished, but here is the outside of what will be seen from the inside.... does that make sense?


This picture shows what it will look like when open. Not a real pretty sight, but most people will never see this when it's on display.

These next three pictures are the wall from the inside.


You can see how nice and snugly the wall fits with the inside of the rooms. This was super important to me. I don't want people to be able to look at it and say, "Oh, this is how you get inside." I want them to have to look long and hard.

As you may have noticed, there is a new stair case added in the hall way. Yup, I decided that a square spiral would go well there to reach my elusive third floor. Here's a better view of it...

Yes, I noticed one of my rail supports is crooked. *sighs I will fix that before I add the top hand railing. It must have slipped before the glue got dry. That happens.

Well, as you can see, progress is being made. It won't be much longer before I am off to get more glass, and get ready to add the third and last floor. I still have bathroom fixtures to put in, so I will work on them this weekend. Hopefully sometime next week I will be wrapping up this second level.

Until next time....

Thursday, May 6, 2010

FINALLY I can work on the dollhouse again!!!!

This varnish took FOREVER to get to the point where it wasn't tacky anymore!!! I guess varnishing it in the hottest and most humid time of the year really wasn't the smartest thing I could have done.... But it's done and dry and now I can move forward!

So, yesterday I set about attaching the movable outside wall. Hinges that can be hidden by trim seemed my best route. They took a while for me to get them exactly right so that the door/wall sits nice and flush against the house so walls can be added to it seamlessly, but it worked out well, I think.


This wall can now be opened and closed to allow access to the entire inside of this side of the dollhouse.

Looks good doesn't it? I am pleased.

Today I should be able to start adding walls to it so that they fit all nice and snugly into the house. I also need to start figuring out exactly how I will be able to "lock" the wall into the closed position. I don't want just anyone being able to open and close it while I am displaying it in shows. I'm thinking I'll do pins.... something like I did for the removable glass walls on the first floor, but I'll have to see how well they can be hidden.

Now, I want y'all to know that I wasn't just sitting doing nothing during my "down" time. I worked long and hard creating plants for this house that will also be for sale. I don't want to post the pictures till they are in place. They have turned out great though, and again, I am pleased.

So, until tomorrow....

Sunday, May 2, 2010

What a difference a day and varnish makes....

Yup, I FINALLY got the varnish on the inside of the dollhouse. I wasn't able to do anything else cause that stuff takes forever to dry, but it's varnished.


The master bedroom looks so much better with the natural wood color brought out.


Even the master balcony has a more finished look and feel to it.


Even the second and third bedrooms are starting to look like some place I'd like to be.

and what can I say about the hall way? Wow. What an amazing transformation. Now I can make some informed decisions on whether or not I want to leave all the walls like that, or paper a couple of them. Hmmm.......

This house is finally starting to look like something. Now to start working on the details. Until next time...

Saturday, May 1, 2010

Trimming out the second floor......

This has to be one of the slowest and most boring parts of building a dollhouse in my opinion. When it's done, it does make a HUGE improvement, but it doesn't give the instant gratification that so much of the rest of it does. Still, trim is a must for a finished look. Without it, your dollhouse just looks unfinished an sloppy.

So, yesterday was trim day. Here are the results....


The master bedroom Is now ready for varnish and it's doors and then glass (after a good cleaning, of course).


The second bedroom is ready for the next step as well, but this room made me giggle yesterday. As I was trimming it out, I got to the closet and in the upper right hand corner I noticed a small bug. Now when I say small, I mean SUPER TINY! I had to get a magnifying glass to see what it was. Well, there in the corner was a spider web that was maybe an inch round and invisible to the naked eye, and right in the corner was a itty bitty spider. Now don't get me wrong. I am one for details, but that took it to a level that I wasn't quite ready for! I hate spiders and they scare the crap out of me (I was bitten by a brown recluse once) but this one was so tiny that even I wasn't threatened, so she was relocated to my garden. I did find it funny though that she was in perfect scale to my dollhouse, and I have to wonder if she realized where she was.


Bedroom #3 is coming out amazing. I have to say that I am really liking the blue and the whole tropical feel of this room. This one is going to be extra fun for me to decorate! I will keep with the feeling and probably use lots of plants and stuff for decoration.

Now the bathrooms are not ready yet. When I do the trim in them, I also have to put in the fixtures at the same time so they can look "built in", and well, I don't have them made yet. So the bathrooms will have to wait for a bit, and I will varnish the pieces before I put them in.

Today I will start varnishing. Once everything is cleaned out, and all the dust is removed, I will set out to get the first layers on the entire second floor. I'm excited. It's the varnish that really makes everything "pop". So, with that in mind I am off to work.

Until next tomorrow....

Friday, April 30, 2010

Doing the walls....

Wow. I almost hate to post the pictures from yesterday since they look bad, but I'm going to hope you realize that once all the trim is in place, it's going to look amazing. This level of the dollhouse is just one of those things that gets a lot worse before it ever gets better. We, we are at the worst. LOL

Yesterday I found a small bucket of drywall mud (joint compound) to cover the unsightly plywood. With a sponge I gave a light texture to the surfaces. This seemed to work beautifully and gave a great undercoat to the paint.

The master bedroom is getting it's trim. This is where I left it yesterday when it started getting too dark to see. I've decided to do this whole level in greens and blues, so I started here with a green "woven" look wallpaper. There is a super light green wall adjacent to it, but from this angle you can't see it.


To complement the green in the marble wallpaper in bedroom 2, I have chosen a darker green accent wall. I then added the super light green for the inside of the closet. I do like greens and wood tones together. It really seems to bring the outside in, and with all the glass in this house, the outside seems to have become the theme naturally.


For bedroom 3, I decided to try something a bit more bold by adding a large print, green on blue, wallpaper to a smaller wall and bring out the blue in the background with a blue wall. I painted the inside of the closet a super light blue. The blue wall has a crackle finish on it, and I will be going over it with a gray wash to simulate the crackle finish in the background of the wallpaper.


For the master bath and closet, I chose the super light green since I had the green in the master bedroom. For the main bathroom though, I went with the light blue. The rest of the upstairs will just be varnished once the trim is in, so that the natural beauty of the woods can show through.

So today will be all about trim. I really would like to get it all in place so that I can start with the varnish. I'm on my way now. Until next time....

Thursday, April 29, 2010

The walls are in! The walls are in!!!

Good morning. Yes, I know that I normally do this blog in the evening, but since no one seemed to notice that I didn't get a blog up for almost two days when our internet was out, I'm guessing that it doesn't really matter when I get this up. So, yesterday when I finished doing what I did, rather than grabbing the camera, I found other things to do, and took the pictures this morning.

Well, yesterday was another busy day for the dollhouse. That made me feel a bit better since I didn't get anything done on it the day before. Now the last of the interior walls are in. Yay, me.

In this picture, you are getting a view of the master bath and closet, the main bath, and the master bedroom. It's a bit better view of the walk-in master shower. That will look like more when the glass is added! The walls need finishing badly!

From this view you can see that the third bedroom finally has it's walls, and you get a tease of the master balcony.

and here is the master balcony.... railing in! Whoo-hoo.

I know this all looks like a huge mess, but it's really not. Today I am going to venture out to the local hardware store and see what is available here to coat the really poor quality plywood. I'm thinking like a plaster of some kind. With that I could do some interesting textures as well, that could really add to the aesthetics of this house. The big question though is what can I find in a small enough amount to work. This isn't like doing this in the States where I could run to Hobby Lobby or Michael's and pick up a pound container. Here I have to depend on a hardware store.... and in a third world country, at that. So, we'll see what I end up with. One thing I have learned here is that you just make things work. Tim Gunn would be proud.


And for my last picture today, you can see the frame I will use for the wall that will open. In this picture I have it taped and clamped to the place where it will fit when it's finished, to insure that it laid flat against it while drying. It would really suck if I had gotten it all put together and then found out it had tweaked or warped in some odd way and didn't lay flat! It's tight fit is crucial to the finished look of this house and to top it off, it's in the front! From here I can fit in the outside walls and whatnots to insure a perfect fit when opening and closing. It has be be exact for the inside as well as the outside to look right when it's done. It almost has to fit together like a puzzle piece.

So, that's where I am right now. I'll post this and get to work on the next step. So, until next time....

Tuesday, April 27, 2010

Two days in one...

Early Tuesday morning...

Hi. I know I normally do this blog every evening, but it was getting late by the time I took the pictures, and THEN the internet went down. It does that from time to time here, as well as the power, the water and the cable. Nothing is real reliable here, that’s for sure, but then on the other hand, it’s never boring either.

Well, yesterday was super hot and SUPER humid. Right now is right in the middle of the summer here in Belize. From mid February to the middle of June are the hottest months here, and yesterday didn’t disappoint. I think it was one of the warmest and most humid so far this year. That’s not really a huge deal ( I actually love the heat just not the humidity) except that things that normally take about an hour to dry, suddenly take three or four. This slows down progress even more. At this point it becomes an exercise in patience. Leaving things alone until they are completely dry is not my strong suit on a normal day. Yup, it’s true…. I’m one of those people that just has to fuss with everything and try to make things happen before they are ready. I am guilty. –hangs head in shame- LOL

So, there isn’t nearly as much to see today as I would have liked. Still, I have a little progress to show you.


Once again, here is the front of the house. As you can see, all the clamps are holding the beginnings of the support system for the “opening” wall I will be adding. I got the rest of the uprights done, and once they were secure, I added the top bracing that the wall will somehow attach to. I still haven’t worked out all the details of this opening wall, but I do know that however I do it, it will have to have good solid support behind it. I sure don’t need ANYTHING coming loose or rattling once the wall is attached with all that glass in it.


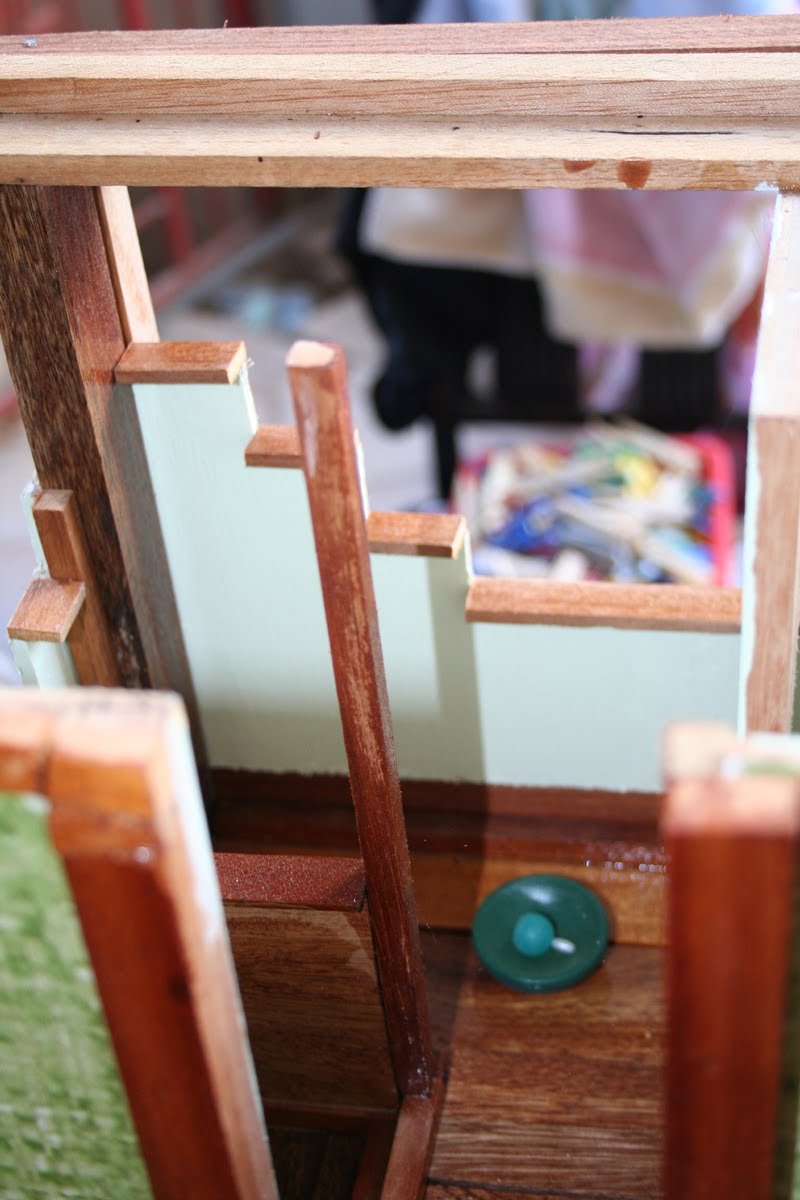
In this next picture, you can see that I put in a few walls. Like I said, it was late when I took these pictures, so I was too lazy to climb the ladder and get good shots from above, but I think you can still get the idea. From the front right moving left, you have the master bathroom, the master closet, and then the bathroom for the rest of the house. They still don’t look like much, but this is the rough layout. I know the main bathroom is still missing a wall, as well as the wall between the closet and master bedroom, but as I said, I spent lots of time waiting for things to dry yesterday. The side walls and support were among them. Maybe I can get them in today. Hey, a girl can dream!

Now, as you may have noticed, some of the plywood used in some of the walls is anything but pretty. I am thinking that a nice coat of paint or wall paper will help with that! This is just one of the things that have to be dealt with when using left over scraps from a furniture maker. If they were nice big beautiful pieces, he would have used them himself, and they wouldn’t have been scrap. So goes life when you are poor and building a “recycled” house. I think if I ever do another house, I will take up a collection first. LOL

Also, in related news… my friend that builds the furniture said that he can probably get my band saw blade from his supplier. Now, I’m not holding my breath since things here are seldom that easy, but it was a glimmer of hope to brighten my day. Actually, now that the weekend has passed, most things seem a little better. That’s good since it is super hard to be wonderfully creative when you are depressed and everything seems to be going wrong.

Tuesday evening….

Today got super busy, and I really didn’t get a chance to work on my house, but I did get to go raid my friends scrap pile, so I have fresh supplies and will be ready to hit it hard in the morning!!
Until then……..

Sunday, April 25, 2010

The building continues in-spite of deversity .....

This has just been a crappy weekend. If it could go wrong, it pretty much has. I haven't been this blue since before I left the States. Still, the dollhouse provides a wonderful escape for me, even if it is slow and clumsy going without my band saw (which you can see in the background of the first picture).


I started today by moving the house away from the wall where it was. This way I can get on both sides of it. It doesn't make for as pretty of pictures, but I'll worry about beautiful pictures when it's all finished.
As you can see, I got the rest of the flooring in, and spent a large part of today sanding. I'm going to wait to do the varnish once all the walls are in so that I can get them done at the same time.
I have decided to try and see if I can get the whole wall on this side open up (put it on hinges) so that I can access the stairs, hall way, both bathrooms, the master closet and the third bedroom. I will have to build the whole wall in a frame, and hang it from a support brace across the top. It should be interesting to see if i can pull it off.


In this picture you can get a better look at how the layout is looking. The second and third bedrooms are closest to you. Many of the walls are still missing, but I'm concentrating on getting some nice heavy supports in so that I can get started on that front wall. There are only two of those in so far, but they'll be in tomorrow, and that will give you a better idea of where I'm going with this.

Now, if you look at the top right of the picture you will see a small section of flooring that is going a different direction. If I had thought to get a close up of that, you would see that it's actually lower than the rest of the floor. That is going to be the master shower. You'll be able to see that better tomorrow too.


From this angle you can get a look at the early stages (framing) of what will be the door from the master bedroom out on to the master balcony.


This picture is taken from the master bedroom end. The blurry wall right in front is the wall between the bedroom and the bathroom. This looks out on to the stair case coming from the first floor.
and this is a closer view. I still need to trim out the opening, but this gives you the idea.

Well, that's it for tonight. It's a slow process, but one I am enjoying.
So, until tomorrow.......